Apple’s latest software update to the Mac and iPad has enabled a feature that, not to sound too cliche, is downright magical the first time you use it. Universal Control allows you to share your Mac’s mouse and keyboard with your iPad.
That means when you move your Mac’s pointer beyond the edge of your screen, it will automatically switch to your iPad and allow you to use iPadOS without switching devices. To be clear, Universal Control isn’t only designed to work between an iPad and a Mac. It’ll actually work between multiple Macs as well. For the purpose of this guide, I’m going to stick to using it between and iPad and Mac to cover both devices. But you could easily do the same thing with two Macs by following the steps below.
There are a couple of things you’ll need to do before you can use Universal Control. I’ll walk you through the initial setup, and then how to use it.
Update your Mac and iPad
Before you’ll have the option to turn on Universal Control, you need to update the software on your Mac and your iPad. The current versions are MacOS 12.3 and iPadOS 15.4.
On a Mac, open System Preferences, then select Software Update.
On your iPad, open the Settings app then go to General > Software Update and follow the prompts.
How to set up Universal Control on your iPad

There isn’t a dedicated Universal Control setting or section in iPadOS. In fact, you won’t find a setting titled “Universal Control” on the iPad at all.
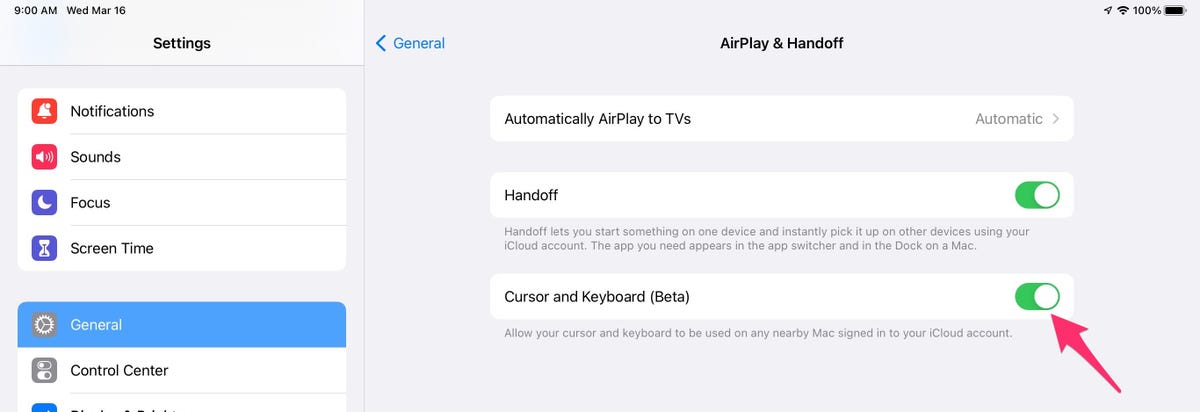
In order to make sure your iPad is setup, open the Settings app then select General > AirPlay & Handoff. Next, make sure the switch next to Cursor and Keyboard is turned On.
How to set up Universal Control on your Mac

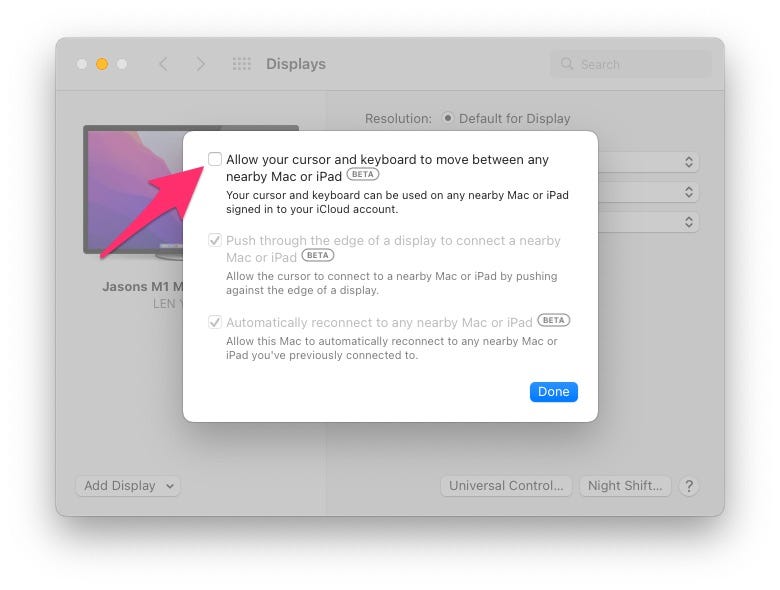
The Mac does have a dedicated Universal Control section where you can turn the feature on or off and adjust settings. Open System Preferences then click on Displays > Universal Control.
Check the box next to Allow your cursor and keyboard to move between any nearby Mac or iPad, then click Done. Leave the other two boxes checked.
How to use Universal Control between your Mac and iPad
With both devices updated and after double-checking that Universal control is enabled, it’s time to actually use Universal Control.
Place your iPad on either side of your Mac’s display, then wake and unlock both of them.
On your Mac, use the trackpad or mouse to move the pointer off the edge of the screen in the direction of your iPad. As you continue to move it, you’ll see the pointer jump from the Mac to the iPad.
Pretty cool, right? Notice that the iPad isn’t simply acting as an external monitor for your Mac — it looks and works just like it normally does, but you don’t have to switch to different input devices.
Want to go back to your Mac? Drag the mouse pointer off the iPad’s screen in the direction of your Mac. Boom.
You can even drag and drop documents between your Mac or iPad, instead of waiting for iCloud Drive to sync or if, for example, you were drawing out an idea in the Notes app with the Apple Pencil on your iPad — you can easily move that to your Mac once you’re finished.
Arrange your displays, adjust settings

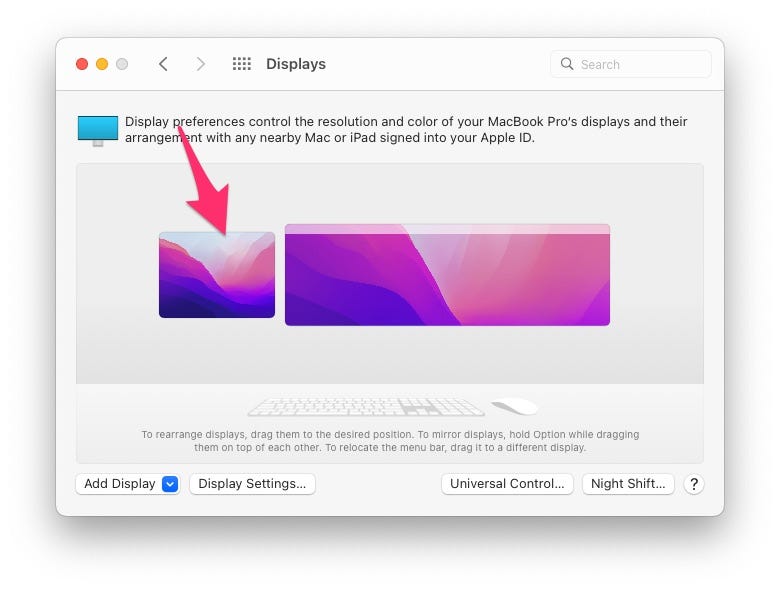
Your Mac will try its best to locate your iPad’s location in relation to your main display, but it’s not perfect. If you go back into System Preferences on your Mac, you can click-and-drag to rearrange the displays, putting your iPad’s screen in the right spot, allowing you to seamlessly move your mouse between the two devices.
Troubleshooting Universal Control
If you’re having issues getting Universal Control to work, here are a few things to check:
- Make sure both devices are using the same Apple ID/iCloud account
- Double-check that you’re running MacOS 12.3 and iPadOS
- Wi-Fi and Bluetooth must be turned on
Finally, if you’re still not having any luck, it could be that your device isn’t compatible. Here’s the full list of supported devices, taken straight from Apple’s support page.
- MacBook introduced in 2016 or later
- MacBook Pro introduced in 2016 or later
- MacBook Air introduced in 2018 or later
- Mac mini introduced in 2018 or later
- iMac introduced in 2017 or later, plus iMac (Retina 5K, 27-inch, Late 2015)
- iMac Pro introduced in 2017
- Mac Pro introduced in 2019 or later
- iPad Pro (all models)
- iPad (6th generation) or later
- iPad Air (3rd generation) or later
- iPad mini (5th generation) or later


